Search This Blog

Tuesday, October 30, 2012

Halloween Chocolate Marshmallows

Halloween Chocolate dipped Marshmallows on a STICK!  J and I have a philosophy.  Anything on a stick is good.  As we have yet to come across a food item on a stick that is not good, so far our philosophy holds true.
I love Halloween.  Screw you Christmas, Halloween is my favorite holiday of the year.  I get more free candy from trick-or-treating then that which comes in a Christmas Stocking or Easter Basket.  Yes, I am 31 and I still go trick-or-treating.  When you are 5 feet tall you can get away with it if the costume is right.  I get to dress up and people think it is normal.  I would dress up every day in various costumes if I did not have this social phobia which prevents me from doing so.  I have a costume drawer.  I can be artistic with my foodies and pumpkin carving.  I love pumpkin flavored everything.  I like going through haunted houses and getting scared.  I'm a screamer.  I scream well.  This year we did Fear Factory.  It's no Rocky Point, but I got a few good scares out of it and the old cement factory building itself is an amazing piece of architecture.  Also, well worth it just to go down the 3 story pitch black slide at the end.  I love make-up, special effects, and crazy costumes.  I boast quite the collection of scary movies.  I am married to a werewolf.  J has many wolfy attributes.  I should list them one of these days.  

 Marshmallows


  • 3 packs of unflavored gelatin (3 Tbs) found in the baking aisle at grocery stores.  Not Jello, gelatin.
  • 1/2 cold water
  • Add gelatin packs to 1/2 cup cold water in a mixer and let sit while boiling the rest of the ingredients.  To a large sauce pan add:
  • 1 and 1/2 cup sugar
  • 1/2 cup water
  • 1 cup light corn syrup
  • 1/4 tsp salt
  • Cook on medium high heat until candy thermometer reaches about 240 degrees.  It takes about 10 minutes to boil.  Once it reaches temperature immediately remove from heat and slowly add to the mixing bowl, mixing on slow with the metal whisk attachment.  Let the syrup run down the side of the bowl.  
  • Once it is all in turn the mixer on high and whip it, whip it good for 12 - 15 minutes.  It will begin to get fluffier.  At the last minute add:
  • 1 Tbs vanilla extract.
  • While mixing grease a pan with shortening or butter and cover in a light dusting of powdered sugar.  
  • Pour the marshmallow goo into the pan (quickly before is hardens) and spread it out with a buttered knife or spatula.  Dust the top with powdered sugar again.  Let the marshmallows sit uncovered for 4+ hours or overnight.  
  • Scrape along the sides of the pan with a knife and dump the pan shaped block out on a powdered sugar dusted table top.

 When cutting the marshmallows out dip the cookie cutter or pizza cutter in powdered sugar.  Once the marshmallow is separated from the rest of the block coat the sides in powdered sugar to keep it from sticking.  Insert stick at the bottom base of the marshmallow.  Cut up the scraps into tiny marshmallows for hot chocolate.
 Get your Candy melts ready.  I am using Orange, Light Green, and Black.  I also have sugar eyes for the Frankenstein Monster.  Victor Frankenstein was the scientist who created the monster, not the monster itself.    To the best of my knowledge the monster has no name.  The book was very boring so I did not read it.
Microwave candy melts 30 seconds at a time and stir until it is smooth and melty.  Dip the Marshmallows into the candy melt color of choice.
Set the newly dipped marshmallows on a wax paper covered pan.  I did not dip the ghosts because I wanted them to stay white I felt dipping them in white chocolate was redundant and I wanted a set of just plain marshmallows.  Refrigerate or freeze the chocolate covered marshmallows until the chocolate has set.  5 - 10 min.  I stuck the sugar eyes on Frankie while the chocolate was still warm so they stick.
With the black candy melts draw some faces on those monsters.
Give Frankie some hair and side blots.
Enjoy.

Monday, October 29, 2012

My First Wedding Cake

My friends Caleb and Amanda got married October 20th, 2012.
It was the most beautiful wedding I have ever seen.  They held the ceremony at a picnic area up the canyon with perfect fall weather.
Amanda asked me to make her cake.  I have been wanting to do a wedding cake for the last two years and I jumped at the opportunity to finally do one.  This is my first wedding cake.  
Four tiers.  Red Velvet and Cream Cheese frosting.  White fondant covering.  Silver ribbon bases.  It got hot and kind of melted off to one side.  I still need to figure out how to get it perfectly stacked and straight.
Her florist did the flower sections and the topper.  I just provided him with the white cake pallet to work with.
During my cake baking process I burned a batch of cakes.  I cut off the burned part and added cream cheese frosting and made cake pops out of them.  They turned out delicious.
I also made a simple 12" x 18" frosting sheet cake in case we needed more cake.  Everything was red velvet and cream cheese.
I am so happy for them and wish them the best as they start their new lives together.  They are such a cute couple.

Monday, October 22, 2012

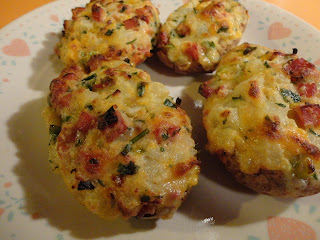
Twice Baked Potatoes with Ham

I have done twice baked potatoes before on the blog, but this time they are with Ham instead of Bacon.  I like to change things up a bit.  This is another of my go-to dinners when I have potatoes and not much else.  They are a bit time consuming, as in, they take more than an hour to make.  Therefore, these dinners are reserved for nights when J has to work late and I have plenty of time to wait for dinner.

Twice Baked Potatoes Recipe

  • Scrub a few large Russet potatoes clean and poke a few holes in them with a fork on both sides.
  • Bake potatoes for 1 hour at 375 degrees in the center of the oven on a sheet pan until tender.  Or as my Momma used to do, put the potatoes directly in the oven without a tray.  She also did this with broiled cheese on toast.  I did it once and flipped the toast when I was trying to get it out.  Nothing like trying to clean up burnt toast and melted cheese from the bottom of an oven.  I put everything on pans now.
  • Take potatoes out of the oven and let them cool until they are easy enough to handle.
  • Cut potatoes lengthwise and scoop out most of the centers and place in a large bowl.
  • Mash potato centers with sour cream, milk, butter, fried ham chunks, cheddar cheese, chives, a bit of salt and pepper and of course, Italian seasoning.  
  • Fill the empty potatoes skins and put them back in the oven.  Lower the temperature to 350 degrees and back for about 20 - 30 minutes longer, depending how hungry you are.  I do not have the gift of patience so I usually can only wait about 20 minutes.
  • Remove from oven and top with more cheese and sour cream.  The potatoes should be crisp on top and lightly golden brown. 

Enjoy.

Thursday, October 18, 2012

Buttermilk Fried Chicken

I am still on my buttermilk kick.  I made buttermilk fried chicken strips with buttermilk mashed potatoes and canned green beans.  J loves green beans so it is the vegetable of choice when I want to make a complete meal.  He hates pretty much every other green vegetable, but at least I know he will eat his green beans.

Buttermilk Fried Chicken Recipe

  • Cut boneless, skinless chicken breast into strips.  Cover strips in buttermilk and let it sit in the refrigerator for 4 - 6 hours.  
  • Fill a large pan with 1 - 2 inches of oil.  I used vegetable oil.  Heat the oil on medium high.  You know its ready when you splash a few drops of water on it and it sizzles.  
  • Things are about to get sticky so if you are tactile defensive or have a phobia of touching slimy things, wear gloves.  If you are not afraid of getting your hands dirty, this is going to be fun.  Mix together about 2 cups of flour with a few teaspoons of  salt , pepper, and any other seasoning such as,  Italian Seasoning.
  • Dredge buttermilk chicken strips into flour until it is well coated then transfer it to the hot oil carefully so you don't burn your fingers.  Fry for about 8 - 10 min.  Half way through, 4 - 5 min, flip it over so both sides are evenly fried a golden brown.  The oil should not cover the entire strip, just about half way up.
  • Remove fried strips and set onto paper towels to drain. 
  • For Buttermilk Mashed potatoes:  
    • Wash and Peel a few russet potatoes.  Cut potatoes into 1 - 2 inch chunks.  
    • Cover potatoes in water in a large pan.
    • Boil for about 20 minutes until tender
    • Drain
    • Mash with butter, buttermilk, salt and pepper to desired consistency.  Add some shredded cheddar or other cheese when serving.

Enjoy

Wednesday, October 17, 2012

Buttermilk Biscuits

I made buttermilk biscuits for dinner.  I am sort of on a Buttermilk kick right now.  I like buttermilk and I am on the hunt for recipes that use buttermilk.  I remember my Grandma used to drink buttermilk every morning.  I cannot stand to drink it straight, but baking with it is divine.

Buttermilk Biscuits Recipe

1 cup flour
1 cup cake flour
2 tsp baking powder
1 tsp sugar
1/2 tsp salt
8 Tbs = 1/2 cup = 1 stick of cold butter diced into cubes.
3/4 cup buttermilk
Food process for a few pulses all the dry ingredients, then add cubes of butter and process that for a few seconds until grainy.
Transfer the mixture to a bowl.
Add buttermilk and mix.
Dump out onto a floured surface.
Knead the dough together until it forms a ball.  Wrap the ball in plastic wrap and refrigerate for 2 hours.  I find this step to be optional since I rarely do it and they turn out great without refrigeration.
Cut out evenly sized pieces and roll into smaller balls.

Bake at 450 degrees for 10 - 12 minutes until lightly golden brown on top.
We had buttermilk biscuits for dinner two ways.  The traditional butter and honey.
Little ham and cheese sandwiches.  Both were tasty.
Enjoy.

Tuesday, October 16, 2012

Peanut Butter Bars

With J's love of peanut butter comes the love of all confections using said product.  Since I made peanut butter I was itching to make peanut butter bars.

Peanut Butter Bars Recipe

1/2 cup = 1 stick of room temperature or softened butter.  All recipes should start with butter.
1 cup oatmeal
1 cup powdered sugar
3/4 cup peanut butter

Chocolate Topping

1/4 cup peanut butter
1 cup chocolate chips
Combine peanut butter, butter, powdered sugar, and oatmeal in a bowl and mix.
Spread peanut butter mix In an ungreased glass dish, cookie sheet, or other pan and pat it down until it is smooth.  This is a small 8 x 8 glass dish that I used.
Refrigerate peanut butter layer while making the chocolate topping.
Microwave peanut butter and chocolate chips 30 seconds at a time, stir and repeat until it is smooth.
Pour chocolate out on top of peanut butter base.
Smooth out chocolate.  This is my house and my rules so I get to lick the knife after smoothing the chocolate.
Sprinkle with crushed peanuts, saved from the peanut butter making process.
Refrigerate.  Cut into squares.  I always see peanut butter bars neatly stacked on pinterest.
Here is my attempt at artfully stacking peanut butter bars.  I broke two in the process.  Broken peanut butter must must be eaten immediately.  It is the law.
I am grateful I do not have nut allergies because these are delicious.
Enjoy.


Monday, October 15, 2012

Peanut Butter

I made peanut butter.  It was much easier than I thought and tastes delicious.  J loves peanut butter so I was excited to be able to make my own for him.

Peanut Butter Recipe

16 ounces = 2 cups of shelled, skinned, and roasted peanuts.  I found them in the bulk food section of Winco.  You can also buy a bag of roasted peanuts and shell them yourself.  This is what I did for my second batch. Or go even farther and roast the peanuts, then shell them, then make the peanut butter.
1 tsp salt
3 tsp honey
2 Tbs peanut oil
Food processor peanuts, salt, and honey for 1 min.
Drizzle in peanut oil as you continue to process for 2 more minutes.
Continue processing until you get the desired smoothness of peanut butter.  J likes his peanut butter smooth.  I like crunchy.
Freshly processed peanut butter tastes so good.  It is nice and warm from the machine.    Store in an airtight container in the fridge for up to 2 months.
Enjoy